
Back in December 2024, I made a candy cane cookie using a wet-on-wet technique that I’d been wanting to try for a while. It turned out very cool, but I quickly realized I’m not great at making patterns on cookies. So when it came time to design a new set, I decided to make it my pattern challenge.
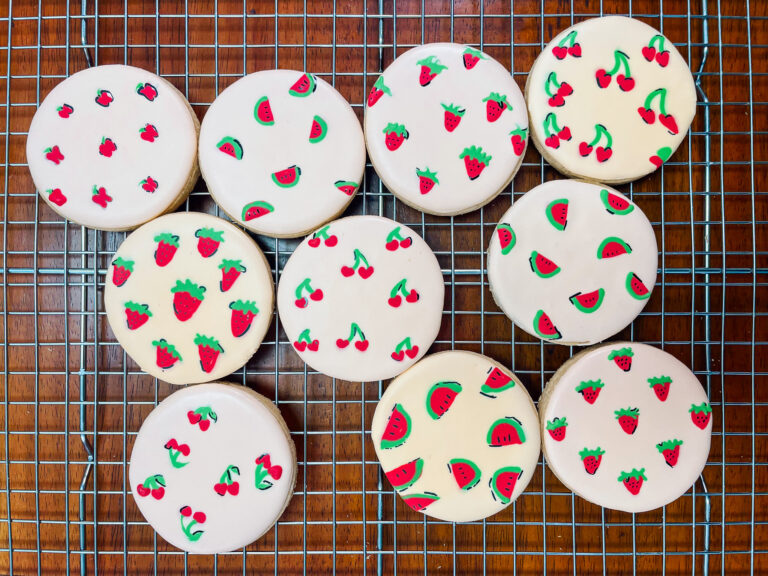
I knew I wanted to include watermelon and strawberry, and after chatting with a friend about the design and how the two fruits were already red, we picked two more red fruits to round out the set: cherry and apple.
Spoiler alert—the apple didn’t quite turn out how I expected, so it didn’t make the final cut. (I still think it looks like an apple, but that’s likely my bias.)

What I learned working on this set is that fruit shapes are way trickier than I imagined going into it, but patterns themselves aren’t so bad if you actually plan them out before you start decorating (who knew you should think before you decorate?).
Supplies
- Brown Sugar Cookie Base
- Royal Icing
- Yellow gel food coloring
- Red gel food coloring
- White gel food coloring
- Toothpick or scribe
- Edible pen/marker
- 4 (or more) tipless piping bags (and scissors to cut them)
- Paper towel
Red Fruit Cookie Designs
This set makes 3 main cookie designs: watermelon, cherry, and strawberry patterns.

This set is all wet on wet, so you have to move a little faster than you may like so everything blends well together. Additionally, I felt it needed a finishing touch of edible pen on it – they just seemed a little too simple when they dried!
Key Takeaways
I don’t make practice sets before I put together a design, so there’s always something I’ll learn and would want to change in the future, here’s those things.
- The beige icing color looks good in pictures, but I made it a smidge darker than I wanted. Go lighter than darker here.
- PATIENCE. With the curve of the watermelon and cherry stems, you HAVE to have patience of letting the icing flow out of the piping bag and guide it, otherwise it will look…not great.
- This set needed a fine tip edible pen. Mine dried out – ugh – so I had to use my thicker edible pen, but fine point would be ideal.